Learning the UEFI boot process the hard way
Recently, I wrote a comprehensive review on the newly released Linux Mint Debian Edition (LMDE) version 6 “Faye” built on Debian 12 “Bookworm“. If you’ve not checked that review yet, I thoroughly recommend you do so. It really is an awesome distro!
One person that did check my review is my partner. Up to this point, her experience of using computers has largely been within the typical Windows ecosystem without really much desire to explore outside of that. She did think Linux Mint looked neat from what she saw both in my review and what I’d showed her though and decided she’d like to try it on her laptop.
Naturally, I was delighted as any Linux nerd would be! She’d seen how easy the installation process was from the review and set aside some time to install it. Her intention was to enjoy some chill time, relax, and have fun playing around with her brand new Linux system.
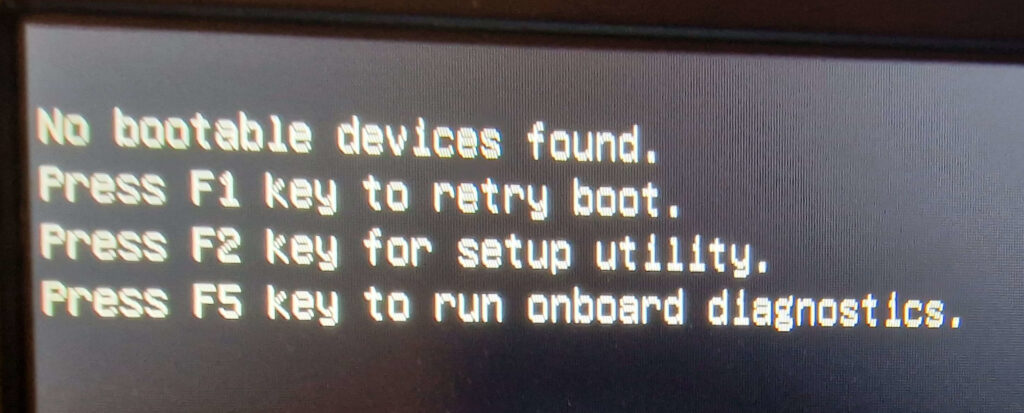
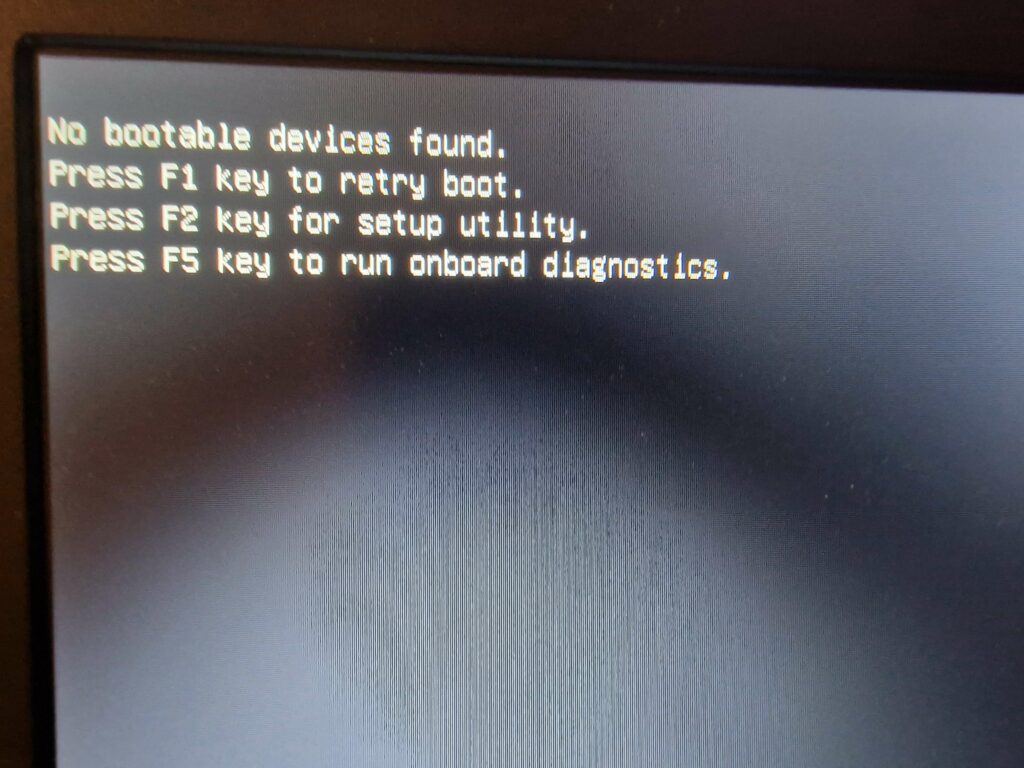
Well, you know what they say. The best-laid plans of mice and men oft go astray. This fateful decision one Autumn night led us down a dark path of hours of debugging after her system failed to boot post-installation of Mint LMDE 6 with the dreaded “No bootable devices found” error message.
The silver lining of it all, though, was the learning opportunity it presented to us. We probably learned more as a result of this about how UEFI firmware handles loading bootloaders than we ever wanted to know! I’ll be sharing the most pertinent parts that helped us solve our problem with you all with the hope it may be useful to somebody.
“No bootable devices found.”
As Linux Mint LMDE 6 was only released as a BETA at the time, it was easy to make the quick assumption that something had gone wrong during the installation process with installing the GRUB bootloader. This felt particularly likely as we’d already ran into an issue with launching the installer to begin with as a result of a bug that’s now been resolved upstream. At the time, I manually patched the Python installation script on the LiveCD so she could get the installation underway. Strike one against Linux in her mind at this point, as she witnessed having to modify code just to get the installer to run. This was already playing into her beliefs that Linux was an overly-complicated OS for nerds. What a disaster!
Reinstalling GRUB
Figuring a quick re-install of GRUB would do the trick to solve the boot issue, or at least show me if there are any problems with installing it, I set to work and booted up the LiveCD again to perform a quick GRUB reinstallation:
# Root up in the LiveCD terminal.
sudo su -

# Mount the newly installed Mint partition.
mount /dev/sda3 /mnt

# Mount the EFI partition.
mount /dev/sda1 /mnt/boot/efi

# Mount special filesystems needed for GRUB reinstallation.
for n in /dev /dev/pts /proc /sys /run; do mount --rbind $n /mnt$n; done

# Chroot into the installed partition and re-install GRUB:
chroot /mnt
grub-install /dev/sda
update-grub
The GRUB installation seemed to succeed without a hitch:
root@mint:/# grub-install /dev/sda
Installing for x86_64-efi platform.
Installation finished. No error reported.

root@mint:/# update-grub
Generating grub configuration file ...
Found theme: /boot/grub/themes/linuxmint/theme.txt
Found linux image: /boot/vmlinuz-6.1.0-11-amd64
Found initrd image: /boot/initrd.img-6.1.0-11-amd64
Warning: os-prober will be executed to detect other bootable partitions.
Its output will be used to detect bootable binaries on them and create new boot entries.
Adding boot menu entry for UEFI Firmware Settings ...
done
So far so good! Problem solved, right? We can just reboot the system and she can spend the evening playing around with her new Linux desktop.
*record scratch*
As you may have guessed, that would have been way too easy. That’s not how it went down at all. Upon reboot, we were greeted with the same “No bootable devices found” error we’d seen before.
Back to square one. It was at this moment I knew we were in for a little bit of long haul debugging unfortunately. I heard the dreaded “I can just re-install Windows on it and it’ll work” at this point. Of course, that just gave me some extra fuel to motivate me to get Linux running. Them’s fightin’ words!
Intricacies of the UEFI boot process
It was clear at this point that the problem lay a little deeper than the bootloader. Specifically, it was obvious that the firmware didn’t seem to even be getting to the point of attempting to boot GRUB to begin with, which I now knew was correctly installed. We were entering territory where my knowledge was on a little more shaky ground. I’d never really had much reason in the past to delve too deeply into understanding how UEFI worked; it usually just did. This is the unglamorous, low-level stuff that just happens and you don’t really pay it much attention. Well, until it doesn’t work that is.
What is UEFI anyway?
The Universal Extensible Firmware Interface (UEFI) is an open standard defining the architecture of the firmware responsible for controlling the boot process and defining abstract interfaces through which Operating System loaders can interact with hardware.
UEFI is a modern way of handling device booting in contrast to the older, proprietary Basic Input/Output System (BIOS) that it replaces. It improves upon the many technical limitations that the much older BIOS is constrained by and fundamentally changes how OS bootloaders are started. UEFI can also enhance device security through its Secure Boot mechanism which ensures only trusted code can be launched by the UEFI firmware, defending against malicious code being executed early in the boot process.
The UEFI specification is coordinated by the UEFI Forum, which is a non-profit collaborative alliance between several technology companies. The current version of the UEFI specification is 2.10 at the time of writing, although past and future versions of it will be available on the UEFI forum’s website.
UEFI boot process overview
In order to discover the root cause of our problem, we first needed to solidify our understanding of the process UEFI-based firmware goes through in order to determine a bootloader to start.
With the older BIOS method, the firmware would look directly at a disk’s Master Boot Record (MBR) for bootstrap code responsible for loading the initial stage of a boot loader and load the first one it found.
With UEFI, the specification defines the GUID Partition Table (GPT) standard for a disk’s partition layout and defines a boot manager responsible for reading the boot configuration settings stored as variables within the NVRAM during start-up. Those variables contain paths to any OS boot loaders or kernels that can be started by the boot manager, as well as a defined boot order priority in the event that multiple boot options exist.
OS bootloaders that are candidates for booting by the UEFI boot manager are stored on a specific disk partition, the EFI System Partition (ESP). If we take a look at how the Linux Mint installer partitions a disk if choosing the “automatic” installation method, we can see a good example of the ESP.
root@LMDE:~# fdisk -l
Disk /dev/sda: 20 GiB, 21474836480 bytes, 41943040 sectors
Disk model: VMware Virtual S
Units: sectors of 1 * 512 = 512 bytes
Sector size (logical/physical): 512 bytes / 512 bytes
I/O size (minimum/optimal): 512 bytes / 512 bytes
Disklabel type: gpt
Disk identifier: 5B7D7665-1A79-426E-B0B5-E9127F702809

Device       Start      End  Sectors  Size Type
/dev/sda1     4096   589823   585728  286M EFI System
/dev/sda2   591872  8990719  8398848    4G Linux filesystem
/dev/sda3  8992768 41940991 32948224 15.7G Linux filesystem
The /dev/sda1 partition in this case is our EFI System Partition (ESP) and has been assigned almost 300MB of space, which typically would be more than enough to store any bootloaders we’d want to use.
If we examine /etc/fstab to determine where it will be mounted we can see that on Linux systems it’s mounted to the /boot/efi directory and the partition is of FAT32 type.
root@LMDE:~# cat /etc/fstab
#### Static Filesystem Table File
proc	/proc	proc	defaults	0	0
# /dev/sda3
UUID=7538acc0-fffe-4322-b30d-1a0155cf66f5 /  ext4 defaults 0 1
# /dev/sda2
UUID=fc962f9f-d421-4cb7-891a-0474365104ab none   swap sw 0 0
# /dev/sda1
UUID=23D2-7081 /boot/efi  vfat defaults 0 1
If we take a look at the files within the ESP’s mount point, /boot/efi, we can see that under the EFI directory, a directory has been created by the installer named debian
root@LMDE:~# tree /boot/efi
/boot/efi
└── EFI
    └── debian
        ├── BOOTX64.CSV
        ├── fbx64.efi
        ├── grub.cfg
        ├── grubx64.efi
        ├── mmx64.efi
        └── shimx64.efi

3 directories, 6 files
This is consistent with the /EFI/vendor_name convention where vendors generally store bootloaders and contains .EFI image files that can be booted by the UEFI boot manager. There are several EFI image files listed here, not just GRUB (grubx64.efi). There’s also fbx64.efi, mmx64.efi and shimx64.efi.
Briefly, fbx64.efi is a fallback boot manager that will read the BOOTX64.CSV file and attempt to re-create an entry in the NVRAM’s boot variable list as defined by the CSV file if for whatever reason all boot entries in the NVRAM are lost.
The shimx64.efi image is the Shim first-stage bootloader designed to be a basic application that can be signed by Microsoft, allowing it to be run by UEFI firmware when Secure Boot is enabled. Due to Microsoft’s market share, every hardware manufacturer recognizes its signature as valid and permit EFI applications to boot if signed by them. It would be impractical and undesirable, however, to have to ask them to sign frequently updated applications like GRUB or the Linux kernel. This is solved by Shim, as it’s basic so very rarely requires updates and can contain further certificates from the distribution that ships it which can be used to sign other EFI applications, such as GRUB, that will be loaded by Shim. Only Shim in this scenario needs to be signed by Microsoft; all other UEFI programs can be signed by the distribution key recognized by Shim. Shim essentially becomes the root of trust for these applications.
Finally, the mmx64.efi image will launch MOK (Machine Owner Key) manager to allow users to manage enrolled keys that can be used to sign EFI binaries to allow them to run when UEFI Secure Boot mode is enabled. While a distribution’s key is usually included within Shim for signing EFI applications as described above, occasionally a user may need to run a custom UEFI application or kernel that obviously won’t be signed by their distribution’s key. They can use their own MOK to sign these components then use the MOK manager to add this key as trusted by Shim for loading those custom programs. Using this special interface is the only way to enrol keys as doing so from within an OS, for example, could potentially compromise the security that Secure Boot is attempting to achieve.
Discussing the intricacies of UEFI Secure Boot is outside the scope of this document, since the issue we were having was explicitly occurring on a system with UEFI Secure Boot disabled to simplify debugging. If interested you can read more about it, however, at the Debian Wiki, or Rod Smith’s excellent in-depth article.
With regards to our issue, examining this directory proved to me that the installer had successfully set up the EFI image files where they should be and that GRUB was most certainly installed in EFI mode, as expected.
Summarizing the UEFI boot procedure
To summarize how a UEFI-based computer will boot, it goes through the following stages:
- At system power-on, the Power-On Self-Test (POST) sequence will fire.
- After POST, the UEFI firmware will initialize basic hardware such as the mouse, keyboard, disks, etc.
- The UEFI firmware, specifically the UEFI boot manager, will read a boot order list from a variable stored in NVRAM. This boot order list contains a list of other variables within the NVRAM that contain information about the OS bootloader or kernel to be booted, including from which disk and which partition.
- Boot entries can also simply be a disk, in which case the boot manager will look for an EFI system partition (ESP) on the disk and attempt to find a fallback EFI application at
/EFI/BOOT/BOOTx64.efi. This is how UEFI bootable removable media works.
- Boot entries can also simply be a disk, in which case the boot manager will look for an EFI system partition (ESP) on the disk and attempt to find a fallback EFI application at
- The boot manager will launch the first EFI boot image in the boot order list.
- If UEFI “Secure Boot” mode is enabled, the authenticity of the EFI image the boot manager has been instructed to load will be verified prior to it being permitted to execute.
Upon familiarizing myself with UEFI and its boot procedure, it was at this stage I was beginning to suspect that the likely cause of our unbootable laptop may have roots in the UEFI boot configuration variables within the NVRAM. We also double checked at this stage that the UEFI Secure Boot setting was disabled during our debugging to remove any complications regarding the prevention of code execution by that mechanism.
Manipulating the UEFI boot configuration
The first port of call was to find a way to view and interact with UEFI boot configuration variables in the NVRAM. Enter the efibootmgr application. This ships as part of the Linux Mint LiveCD and probably many other distros as well. Checking out the man page for efibootmgr it states:
efibootmgr is a userspace application used to modify the UEFI Boot Manager. This application can create and destroy boot entries, change the boot order, change the next running boot option, and more.
–efibootmgr man page.
Sounds perfect for our use case! Let’s put it to work.
Checking our current boot configuration
Running the efibootmgr app with the -v parameter will show the current boot manager settings, with additional verbose information from the NVRAM according to the man page, so that’s what we did.
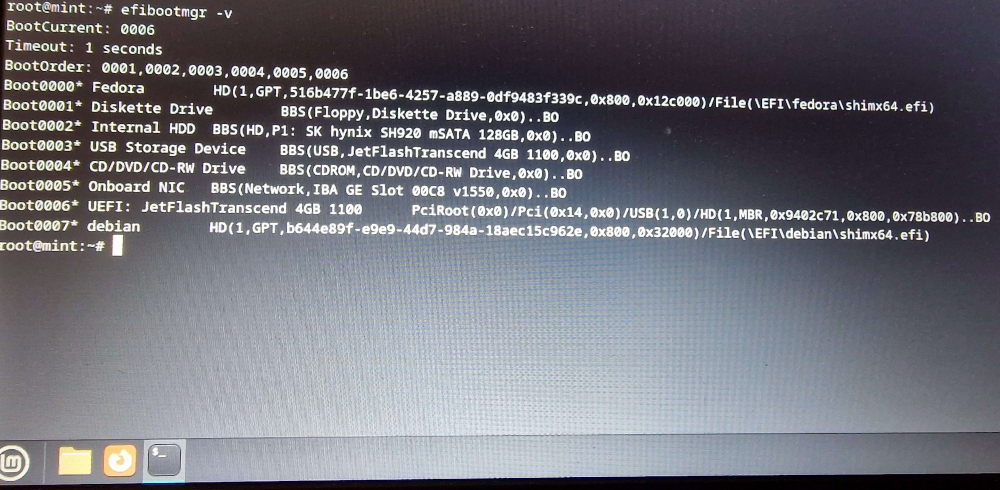
This output shows a list of all configured bootable EFI applications within the NVRAM. The verbose output is also showing the locations of each of the respective bootloader’s .efi image files where applicable. Interestingly, an entry for an old Fedora installation was also present.
Of particular interest to us though is the Boot0007 entry called “debian”. This entry will load the shimx64.efi bootloader which is built to handle scenarios when UEFI Secure Boot is enabled. Even though we have Secure Boot disabled, this is still okay as Shim is capable of simply loading GRUB without any of the Secure Boot stuff when it detects that it is disabled. It’s preferential to load Shim rather than GRUB directly in case we enable Secure Boot in future.
After confirming that the hard drive UUID was referring to the correct EFI System Partition as automatically set up by the Linux Mint installer, and previously confirming that the EFI image files were indeed properly installed in EFI/debian/, we were momentarily confused as to why it wasn’t booting. This was until we took a closer look at the BootOrder variable shown above the boot entries.
Despite the Linux Mint installer adding a correctly configured boot entry into the NVRAM that would start Shim/GRUB, the Boot0007 entry was not present in the BootOrder list, meaning the UEFI boot manager would never even look at the Mint entry as a candidate for booting! We finally discovered the source of our woes.
Changing the UEFI boot order configuration
While I found it highly unusual behavior for the installer not to add itself to the boot order, which I’d never observed before in any installation of Mint/Debian, the fix did seem rather simple at this point. We’d just use the efibootmgr tool to manipulate the contents of the BootOrder variable to ensure that the entry for Mint is included.
efibootmgr -o 2,3,4,7,5,6The updated version of the boot configuration variables were output immediately after using this command, confirming they were applied.
root@mint:~# efibootmgr -o 2,3,4,7,5,6
BootCurrent: 0006
Timeout: 1 seconds
BootOrder: 0002,0003,0004,0007,0005,0006
Boot0001* Diskette Drive
Boot0002* Internal HDD
Boot0003* USB Storage Device
Boot0004* CD/DVD/CD-RW Drive
Boot0005* Onboard NIC
Boot0006* UEFI: JetFlashTranscend 4GB 1100
Boot0007* debian
We can clearly see an entry now for 0007 in the BootOrder, so its time to restart and hopefully boot into our new Linux Mint system finally. Cue a very confident-sounding me telling my partner that she can finally play around with Mint.
Only, once again, it wasn’t to be. Upon reboot, we received the very familiar “No bootable devices found” error. I was dumbfounded at this point. So sure I’d resolved the issue through this meticulous debugging journey, I was left scrambling to find answers once more.
While pondering things, I booted up the Mint LiveCD once more and ran the efibootmgr command to review the boot configuration. I was shocked at what I saw in response.
root@lmde:~# efibootmgr
BootCurrent 0006
BootOrder: 0001,0002,0003,0004,0005,0006
Boot0001* Diskette Drive
Boot0002* Internal HDD
Boot0003* USB Storage Device
Boot0004* CD/DVD/CD-RW Drive
Boot0005* Onboard NIC
Boot0006* UEFI: JetFlashTranscend 4GB 1100
Boot0007* debian
Yes, that’s right: the entire BootOrder variable had reset itself back to its previous order before it was altered! You could be forgiven for assuming the attempt to manipulate the order failed to begin with, but I had checked explicitly that the new values were within the NVRAM before rebooting. I’d also previously removed the old Fedora entry with efibootmgr before changing the boot order and that had stayed deleted, so I knew my writes to the NVRAM were succeeding.
I tried one more time to manipulate the boot order, this time wiping the BootOrder variable entirely.
root@lmde:~# efibootmgr -O
BootCurrent: 0006
No BootOrder is set; firmware will attempt recovery
Boot0001* Diskette Drive
Boot0002* Internal HDD
Boot0003* USB Storage Device
Boot0004* CD/DVD/CD-RW Drive
Boot0005* Onboard NIC
Boot0006* UEFI: JetFlashTranscend 4GB 1100
Boot0007* debian
Then re-adding just the Debian entry to the BootOrder variable.
root@lmde:~# efibootmgr -o 7
BootCurrent: 0006
BootOrder: 0007
Boot0001* Diskette Drive
Boot0002* Internal HDD
Boot0003* USB Storage Device
Boot0004* CD/DVD/CD-RW Drive
Boot0005* Onboard NIC
Boot0006* UEFI: JetFlashTranscend 4GB 1100
Boot0007* debian
I also tried to set some of the entries to “inactive” state, hoping perhaps they wouldn’t be re-added to the BootOrder by the firmware. Specifically, I set the non-existent “Diskette Drive” to inactive, as well as the entries for the CD Drive and NIC card.
root@lmde:~# efibootmgr -A -b 1
root@lmde:~# efibootmgr -A -b 4
root@lmde:~# efibootmgr -A -b 5
Once again this failed, and once again when examining the boot variables using the LiveCD they were put back to what they were by the firmware on boot. On top of that, and rather interestingly, the entries that I had previously set to “inactive” had received duplicate entries in the boot configuration which had then been added to the BootOrder!
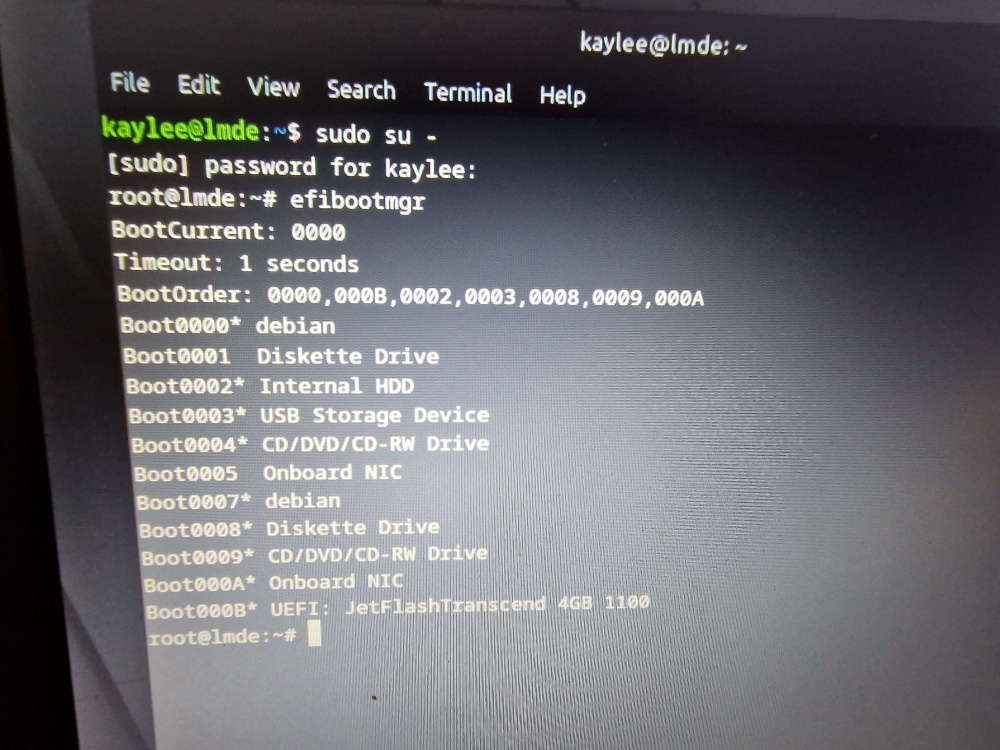
root@lmde:~# efibootmgr
BootCurrent: 0000
BootOrder: 0002,0003,0008,0009,000A,000B
Boot0001 Diskette Drive
Boot0002* Internal HDD
Boot0003* USB Storage Device
Boot0004 CD/DVD/CD-RW Drive
Boot0005 Onboard NIC
Boot0007* debian
Boot0008* Diskette Drive
Boot0009* CD/DVD/CD-RW Drive
Boot000A* Onboard NIC
Boot000B* UEFI: JetFlashTranscend 4GB 1100
What a mess. But, this explicitly confirmed that the firmware was directly manipulating the UEFI variables on reboot and 1) attempting to preserve a list of devices it thinks should be there and; 2) enforcing some kind of lock on the BootOrder and resetting it to predefined defaults, even removing entries explicitly added to it such as our Debian entry.
Using BootNext
When reading the manual for efibootmgr I also noticed it provides the option to set the contents of the BootNext variable through use of the -n argument. If set, the BootNext variable will supersede BootOrder for one boot only with the boot option of your choice. I decided to try this out to get Mint to start.
root@lmde:~# efibootmgr -n 0007Upon reboot, the GRUB bootloader successfully booted and gave us the option to start Mint! This was the first time we were able to boot into our new system, but I knew this was for a single boot only. Sure enough, upon the next reboot it went right back to reading the BootOrder variable and giving us the error. This was useful to confirm for sure that the firmware was capable of booting Shim which immediately started GRUB and the boot entry for it was absolutely configured correctly.
Trying to make sense of the firmware behavior
On the plus side, I knew the exact problem now. But frustratingly I also had no answers either. Upon researching this issue, I found some interesting discussion in the issues section of the efibootmgr Github of people having similar experiences on certain laptops/firmware.
I add, that it resets on reboot to order, that I see in EFI control utility (BIOS) in boot priority list. When I change order here, it really changes and Linux boots first. But changing it by efibootmgr does no effect, as on reboot it resets to order in BIOS.
– krnekit
Apparently Acer customizes Insyde’s firmware after they take delivery, and they’ve (maybe) got another variable they’re keeping the boot order in, and regenerating it each time during boot.
– vathpela
This is completely nonstandard behavior, but if we can identify what they’re doing, we may still be able to make efibootmgr support it.
[…]
The problem turned out to be a buggy UEFI BIOS whereby it required grubx64.efi to be set as “trusted” even when Secure Boot was not being used.
[…]
– barjac
For every Supermicro X10 (X11 should be the same) user which can’t set the uefi boot order from linux with efibootmgr:
It’ not your fault – it’s Supermicro’s fault -> [1]. They prohibit the change of the boot order from non-windows or non-signed-kernel systems.[…]
– xiconfjs
Huh, turns out I overlooked “Lock Boot Order” setting in setup menu. Disabling it allows to create new boot entries
– mlen
I am on a Dell XPS 9343 (bios A14) and I experience a similar problem: I can manage with boot entries, boot order, timeout with efibootmgr but when I reboot, settings are resetted to their original values.
– mattia-b89
There are so many different stories of the same or similar issues on so many different firmware versions, seemingly. Each with a different cause and fix.
One of the common themes from what I noticed were the various buggy or non-standard ways certain firmware implements the UEFI specification, or adding their own “security features” within their UEFI settings. It felt like something similar was definitely the case with her Dell Latitude E7250 and its firmware.
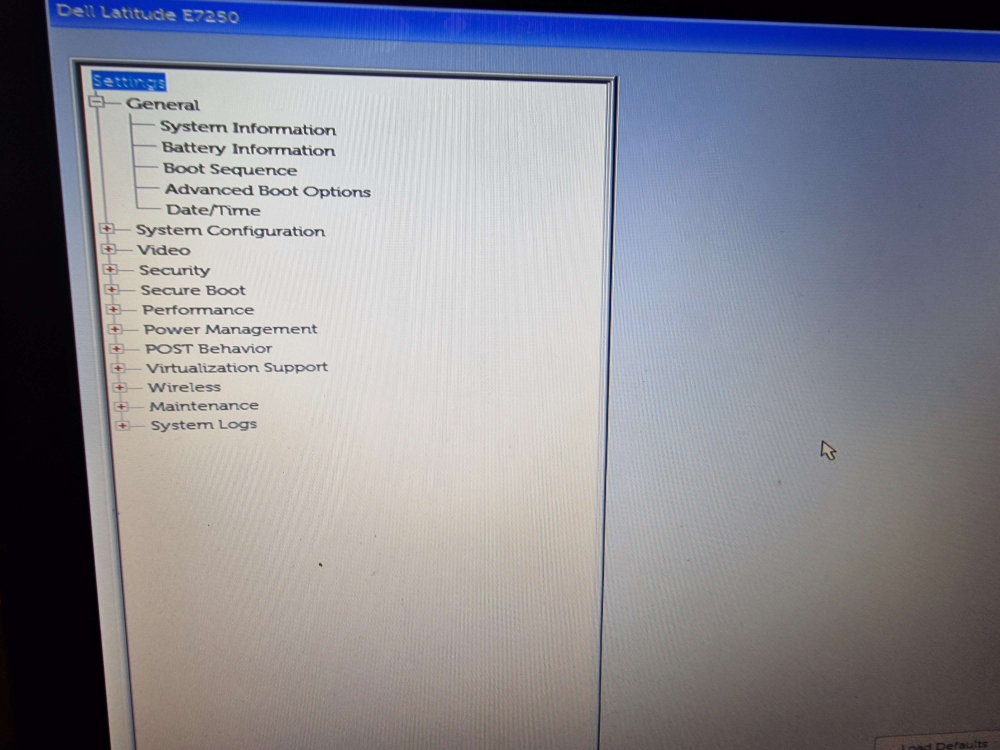
Delving into the UEFI config menus
Some users in the Github discussion made reference to various settings within the UEFI settings page. This is the menu that can generally be accessed by hitting F2 immediately after turning on your computer, or the DEL key/others depending on firmware implementation. Some describe this as “entering the BIOS/CMOS” and while that phraseology isn’t technically correct on a UEFI system its still used as a carry-over from the days of yore.
We got to work looking through this menu for anything that could help us with our issue.
Here we were looking for anything that could relate to “locking” the boot order, or manually “permitting” or “approving” a specified UEFI program to run. To no avail; we found nothing of a sort.
We also attempted to toggle UEFI Secure Boot mode as suggested by another commenter but this also did not work.
The only area related to booting that seemed relevant was the “Boot Sequence” section under General Settings.
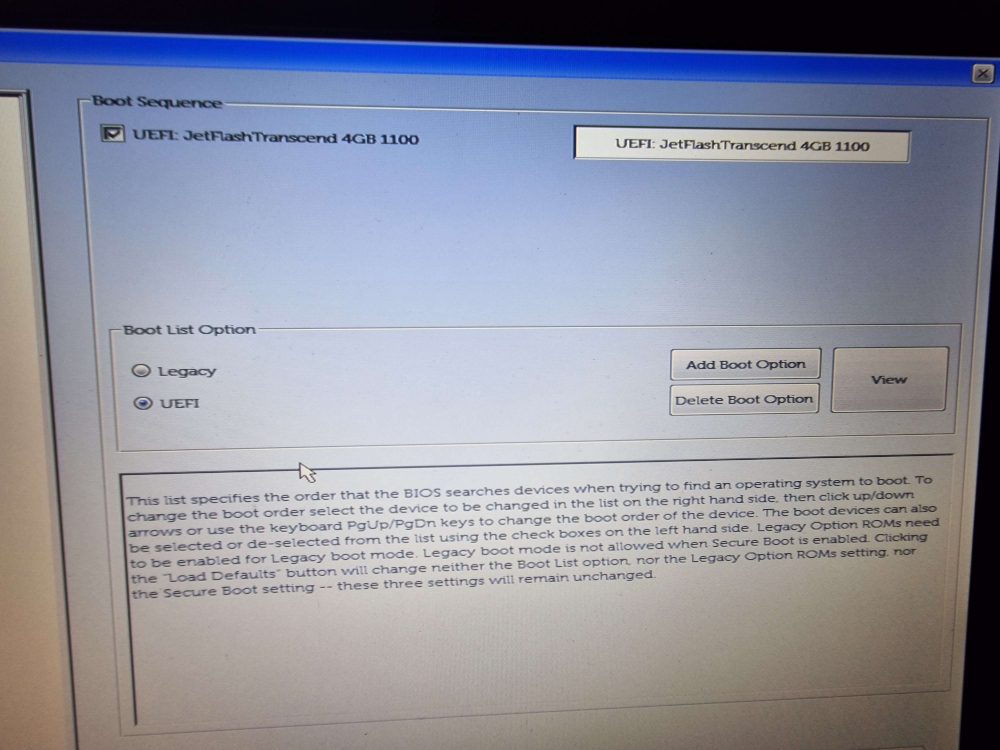
This was only showing the USB drive that the Mint installer was on. I was expecting to see here a menu that mirrored the BootOrder variable list when viewed with efibootmgr.
We decided to use the manual “Add Boot Option” to this to see what would happen.
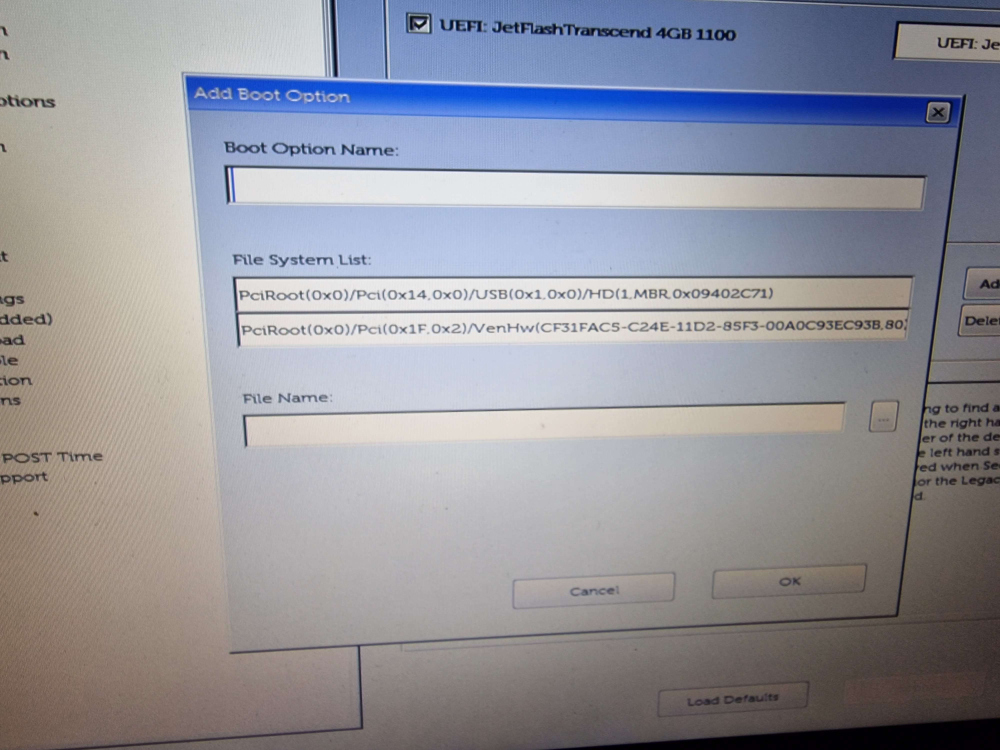
After entering “debian” as our boot option name to mirror the installer then choosing the EFI System Partition from the “File System List” and looking through the filesystem we saw the now familiar “EFI/debian” directory and its contents.
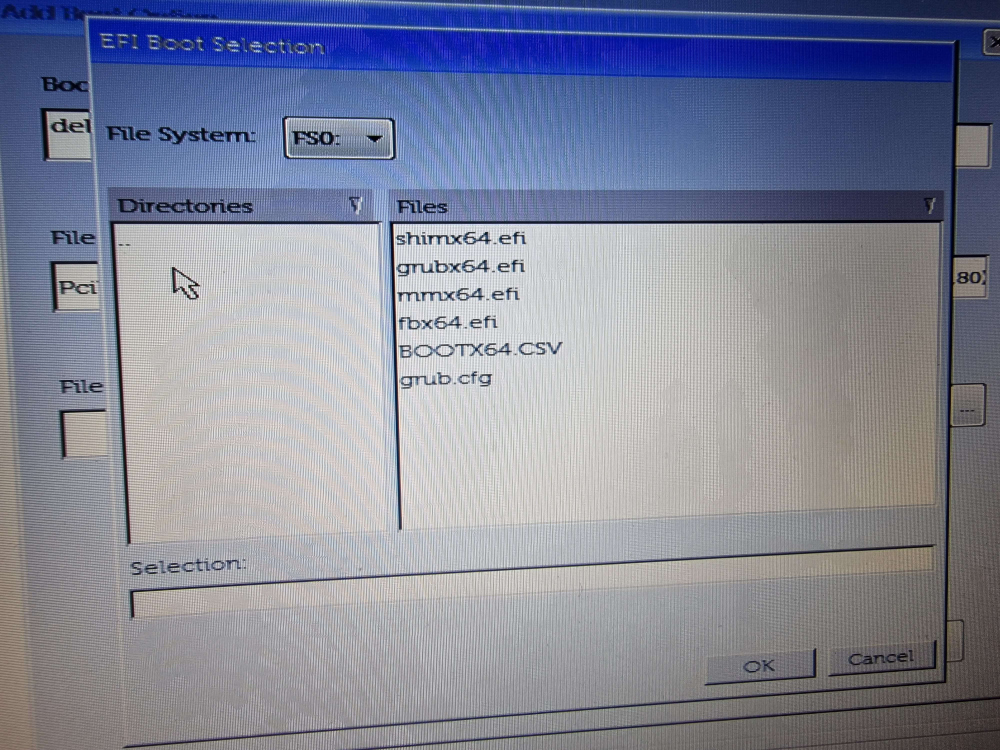
We chose shimx64.efi from this list, again mirroring the installer, and hit OK. Our newly added boot entry was now showing up within the Boot Sequence list in the UEFI menu. So far, so good. Now the big test: the reboot.
Rebooting after UEFI menu boot sequence changes
After rebooting, we were greeted by the most beautiful thing in the world, the GRUB boot menu! I don’t think I’ve ever been so happy to see it in my life!
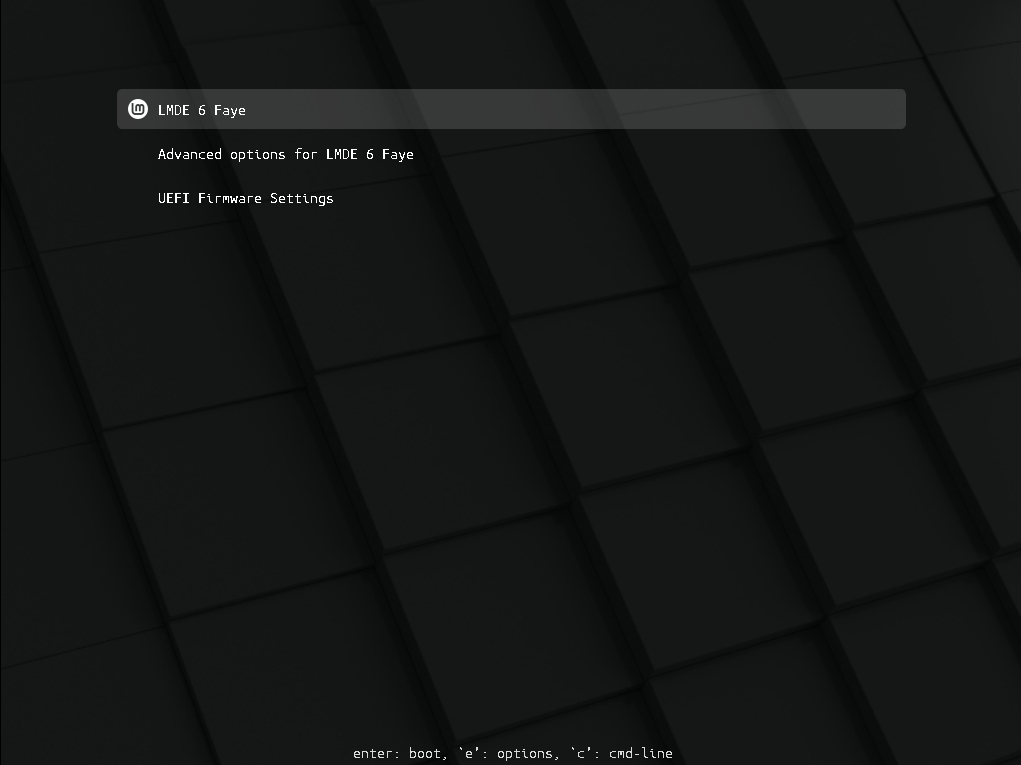
GRUB dutifully booted into LMDE 6 and we got to the beautiful Cinnamon desktop.
After this long and arduous learning and debugging journey, it’s never looked so majestic!
We decided to take a peek at the output of efibootmgr from within the new Mint installation to see what state it was in after our manual changes via the menu.
We can see here that as a result of the manual addition, the firmware has decided to now put the manually entered “debian” entry to the top of the list and add it to the BootOrder in position number one. That works for us! We finally have a system that consistently boots to our Mint installation.
Conclusion
This was a frustrating issue to deal with and the root cause seems to be either buggy firmware, or certainly some very non-standard behavior in implementing the UEFI specification with the UEFI BootOrder variable being reset to a default state on reboot. It seems the Mint installer likely added itself, as per usual, to the BootOrder upon installation but the firmware had other ideas and immediately removed it when rebooting from the installation media.
This issue doesn’t seem to be unique to us, as many other users using different laptops and firmware appear to have had very similar issues with a variety of different fixes as evidenced by the Github discussion. We were able to find a solution that worked for us that entailed adding a manual EFI boot entry via the UEFI configuration menu. Some even suggest resetting the UEFI settings back to factory defaults will fix this behavior, which we stopped short of doing as the manual addition of the bootloader worked in our case and we had no reason to continue tinkering beyond that point. Your mileage may vary with any of the fixes or solutions described or shown here.
One thing is for sure though, this problem provided an excellent opportunity to delve into the inner workings of the UEFI boot process and learn more about it. It was something I’d never really thought too much of before and I was more familiar with the old BIOS/MBR method of loading bootstrap code having had to play with that way more often back in the day. After this issue, I’m certainly a lot more confident in my knowledge of the UEFI boot process and debugging this was worth it for that knowledge alone.
As for my partner, this is now unfortunately her baseline experience and expectation of Linux. This incident certainly did nothing to dispel her preconceptions about Linux being this super complex thing not meant for regular users that requires intricate knowledge and frequent terminal use, even if the problem’s root cause was firmware based rather than anything within Linux itself! Now it’s working though, she is enjoying the Linux Mint desktop experience and I hope in time it grows on her and her experiences with Linux are a lot more pleasant and less complex!